Irrigate your garden with water collected from your gutters. Basic tools and materials from your local hardware store are all you need for this backyard project
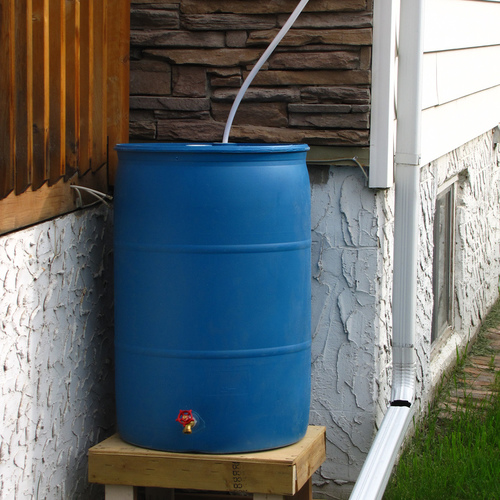
You can have a ready supply of water for your roses or rutabagas just by harvesting the rainby building an inexpensive rain barrel. Once you’ve collected all the parts it only takes a few minutes — here are the basic steps:
- Install a faucet in the side of the barrel
- Install an overflow at the top of the barrel
- Cut a hole and put screening over the top to keep debris out of the rainwater
The first thing you need is a watertight container. Danielle Sherry, assistant editor at Fine Gardening magazine, recommends looking in the Yellow Pages under containers to find wholesale distributors. They sell relatively inexpensive watertight containers. Otherwise, try a local hardware store or discount store.
IRRIGATION RESOURCES
Green Basics
Green Irrigation
Native Plants and Soil
Product Guide
Irrigation systems
Rainwater harvesting
Q&A Forum
Metal roofs for rain collection?
Further Resources
4400 gallon-per-month rain collection system
Attach the faucet component
The faucet should be approximately 1 inch from the bottom of the barrel. For this step, you need a tube of silicone, a 1-inch washer, a 3/4-inch female coupling, a 3/4-inch hose bib, and a male faucet. You also need a 15/16-inch spade bit and an electrical power drill. Don’t forget the safety goggles. Now drill a hole 1 inch from the bottom of the barrel. Next, run a little bit of waterproof silicone around the washer before placing it over the hole. The silicone keeps everything exceptionally watertight. Take the faucet and screw it in until you get it pretty snug to the barrel. It’s really important not to point the faucet directly toward the ground. It should be a little bit off to the side, which makes it easier for you to attach a hose to it, or even sneak a bucket up underneath it.
Crawl inside
Now comes the really fun part. You have to put the coupling on the other end of the faucet. So, you get to crawl right inside the barrel. Attach the coupling nice and tight. The water is going to flow right out of the coupling to the faucet.
Put in the overflow outlet
For this step, you need a 2¼-inch hole saw, a 1¼-inch elbow (check the plumbing supply department at your local hardware store), and a sump pump kit. The overflow hole goes about 1 inch from the top of the barrel. If too much rain falls into the barrel, the overflow hole will divert it away from your house. Cut the hole, and attach a 1¼-inch barb (it has a 1½-inch male end). It fits rather loosely in the hole, so run a bead of silicone around the outside. The fit won’t be particularly tight, because there’s no pressure on this fitting. It’s just there in case the barrel gets too full; the water will flow right out. Next, attach a 1½-inch female PVC elbow to the inside of this barb, and lock it down. Use the flexible tubing in the sump pump kit and attach it to the barb. Lock it down with a clamp. Run the tube as far away from the house as you need to so that it doesn’t leak all over the foundation if the barrel overflows.
The final step
Put the top back on the barrel, and get your jigsaw ready. You’re going to cut a hole in the top. This is where your gutter will spill into. It’s easiest if you can get a starter hole going first; use the drill. Then, using the jigsaw, cut a pretty good-size chunk out of the top of the barrel. Remove the top when you’re done. Using replacement screen from the hardware store, run it across the open barrel and secure it. You can put the top right over the screen and lock it down. The gutter is going to flow right into the opening in the top of the barrel. The screening there will keep out mosquitoes so that they don’t lay any eggs or larvae in the rainwater. It also will keep out debris. Using scissors, cut off the excess screening around the outside of the barrel.
Weekly Newsletter
Get building science and energy efficiency advice, plus special offers, in your inbox.


11 Comments
Rain Barrel
Please check the size of the items you are advising people to use. 5/16" (.3125) is less than 3/8" and it looks as though you are using at least a 5/8" spade bit.
Thanks James
James,
Thanks for helping us keep things accurate. I changed the text to the correct dimension of 15/16-inch. It would have been a little tough to get a 3/4-inch fitting through a 5/16-inch hole.
Rain barrel
Loved the how to's. What is used to secure the screen to the barrel?
ouch.
Thanks for the great video... my favorite part were the bandaids!! : )
barrel
Hey Guys, just watched the video. Nice presentation. I considered the same for my garden except my plan was to link about 10 or 15 barrels together to use in my rather large veggie garden. Decided against it. Not to "rain" on anyone parade, but has anyone considered the amount of energy and resources (including transportation ) to manufacture the plastics and metals used in this project against the fact that you are really only capturing 30-50 gallons of water? (that's like a fraction of what a family will use in one day of showers) Although I understand that the system replenishes itself during rainy days, it still seems like not a large amount of water to justify the cost of materials and waste. It seems like a feel good project that creates more waste and pollution than actual benefit to the environment.
More than just feel good?
Tomasz B,
I'll admit that a rain barrel isn't the answer to everyone's irrigation problems, but it might make sense for a remote spot in the garden where you would normally be lugging buckets of water. It wouldn't be too much trouble to add a timer and maybe a drip irrigation system to make the barrel work by itself.
On the materials subject, It might be a good idea to reuse barrels from some sort of food production business. a vineyard is the first place that comes to mind, but I've got a pickle factory near me that always has old polyethylene barrels available.
Securing screen
Sandy,
there are many options for securing screen to a barrel. Often the lid itself fits tight enough to hold the screen and provide a good seal. Otherwise, I would probably use a bungee cord or a large industrial rubber band. Twine or bailing wire would work too.
free materials
Rob, I agree with you on recycling already used and existing material. If you can acquire most, if not all the materials for free, or you allready have the stuff sitting around in your garage than its a worth while effort. Big issue on the west coast is that we have long periods of no rain during summer and lots of rain in winter. (I'm in Seattle) So while its raining you don't need the rain in the barrel and when it stops you use up the water in a matter of a day or two and will not get "free" water again for possibly months. So the system is not really used at all in both cases. This would be even more extreme in places like Arizona or Nevada. If you live in a place were you get rain on and off all year round, then there is really no need for the system since the gardens water needs will be taken care of by nature. I think its good to have these discussions. So thanks for commenting.
shingles...
One major omission from this video is that you shouldn't be using rain catchment water from an asphalt shingled roof to feed your fruits/veggies. It's fine for flowers but the benzene and other oil residues that come off an asphalt roof would be a bad thing to add to your veggie patch.
shingles, really?
Lefty,
Is runoff from shingles really that dangerous? Can you point us to data or studies or is this worst case? I grow veggies in a border garden around my house that is watered, in part, by roof runoff. I'd hate to give that up.
Dan
Shingles and more
@Dan:
Here is a link with plenty of references to studies, guidelines and recommendations.
http://en.allexperts.com/q/Occupational-OSHA-Environmental-1417/roof-material-use-cistern.htm
I would think that if you added a pre-filter it would greatly diminish the petrochemical leaching into your catchment system and let you continue to use the current system. I'm not an expert in the field but only wanted to let people know of the potential drawbacks.
Here is a really cool pre-filter that I found online:
http://superwall.com.au/products/superhead/
Log in or create an account to post a comment.
Sign up Log in