

Image Credit: All photos: David Goodyear
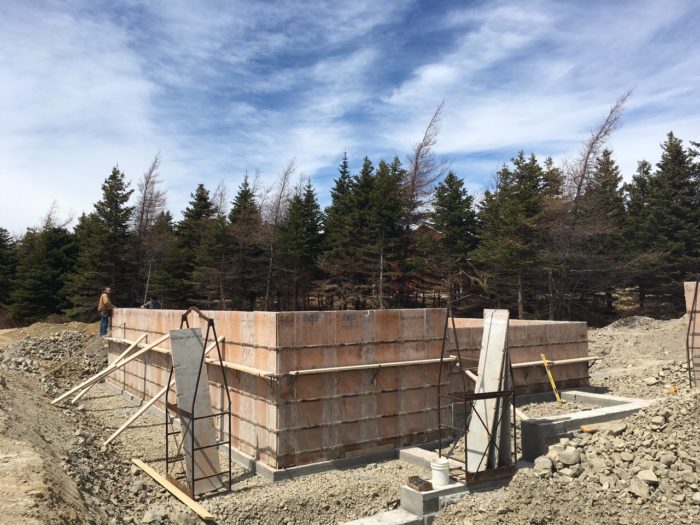
Image Credit: All photos: David Goodyear Removing the topsoil, nearly 2 feet deep in some areas, is the first step in preparing the site for the foundation. It will need a significant amount of compacted fill. It took nearly three dozen tandem loads of blast rock to create a structural pad to support the footings, frost walls and slab.The rock was compacted with a roller and inspected by a structural engineer. With the footing forms set on a compacted rock base, the contractor uses a transit to establish lines marking the finished concrete height. Once the footing forms were established, placing the concrete was a breeze. The footings are stepped to accommodate a sloping lot. The completed footings at Flatrock Passive.
More Guest Blogs


Editor’s Note: This is one of a series of blogs by David Goodyear describing the construction of his new home in Flatrock, Newfoundland, the first in the province built to the Passive House standard. The first installment of the GBA blog series was titled An Introduction to the Flatrock Passive House. For a list of Goodyear’s earlier blogs on this site, see the “Related Articles” sidebar below; you’ll find his complete blog here.
April has brought relatively good weather. This week has been above 0°C (32°F), and the temperatures are climbing. For the most part all the snow is gone and the ground has thawed. The switch in weather has made it easy to get some work done.
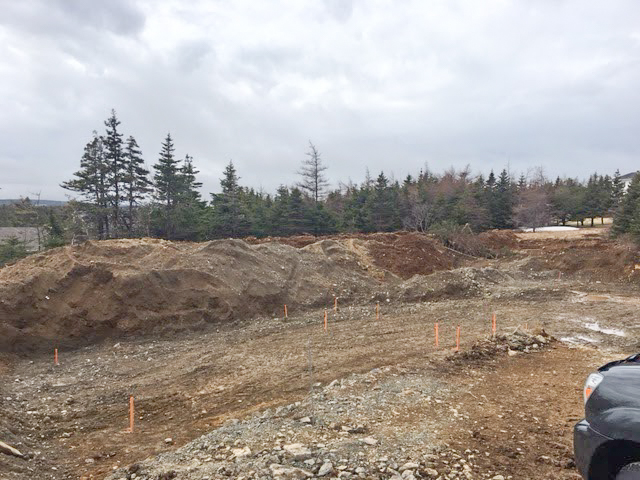
The excavation company, Wade’s Excavating, dug down to solid ground. There was an amazing amount of topsoil on the lot. In places, it was almost 2 feet thick. It has all been pushed out of the way for now, waiting to be moved around and used for final grading after backfilling. After the hole was dug, we hired Aubrey Burt, a land surveyor, to roughly mark out the foundation pad (see Image #2 below).
We knew we would require fill in places, and we will need a lot of it. We won’t be able to use a 4-foot frostwall everywhere; if we did, backfilling to the top of the wall at the back of the lot will turn the lot into a ski hill. Our plan is to make a stepped frostwall of varying depths — from 8 feet to 6 feet to 4 feet — from the low to high parts of the lot. We may do siding part way down the insulated concrete or just leave it with the concrete parging over the foam.
Behind the garage will be nice and sunny and I have been thinking about using that area for my solar kiln for drying green wood for woodworking and firewood. So leaving the foundation exposed there may not be a big deal.
Creating a compacted structural pad
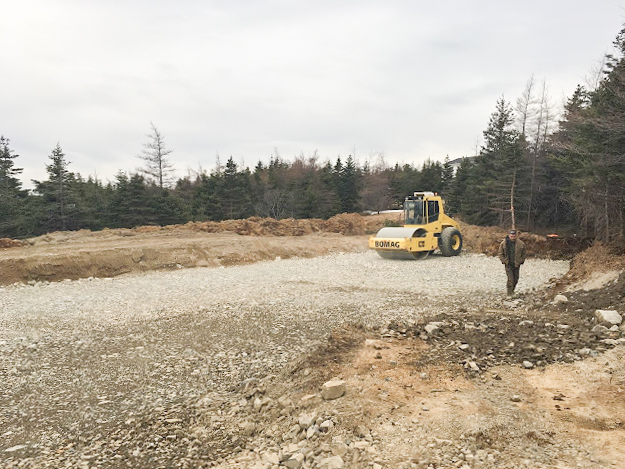
Wades Excavating completed the structural pad in early May, a day ahead of schedule and a day quicker than the original time estimate. They trucked in 34 tandem loads of blast rock to fill the hole for the house and rolled it in with a vibrating roller to pack it down (see Image #3 below).
The site was inspected by a geotechnical engineer who will now certify it’s good to build on. The depth of the hole was very deceiving and I realize that, in such large quantities, fill cannot be estimated visually. So keep in mind that structural fill will really chew a hole in the excavation budget if you ever decide to build on a sloped lot. A 4-foot drop over almost 80 feet is enough to add significantly to the cost of your home.
With the pad in place, we now have a good solid foundation for the house. Parts of the pad will have to be dug down in the back for footings and to facilitate our grading plan. I’ll also be calling the well driller to have a look at the proposed position of the well. If he thinks he can fit the drilling rig between the house and the trees we’ll be ready to move ahead; otherwise, we’ll be waiting for several weeks for the well to be drilled before we start the foundation.
The build is now about two weeks ahead of my original proposed timeline, so we have some time to play with. But I know that other things will pop up. If we can keep the momentum going, we’ll be in better shape later.
Digging the foundation footings
Armed with our plan, we had the surveyor mark the foundation corners. We started digging and taking grades with the transit as we went. The digging went smoothly. All the rock that we brought in for the pad was excavated and placed in the center where it will be used to fill in the foundation before placing the slab.
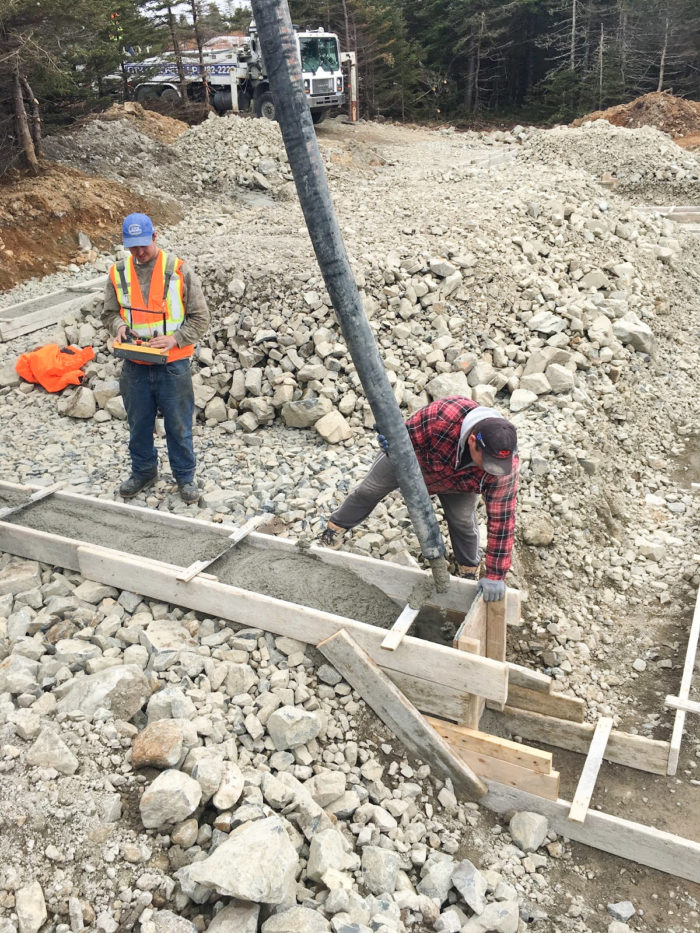
After the footings were completely dug out, they were “tracked in” using the excavator. I followed up by tamping the footing areas for a couple of hours so we have a good stable base for the footings. With the footings dug, the next logical step was pouring them. We had the surveyor re-pin the foundation location and the footing contractor, Todd Brenton, set up the footing forms. The lot was pretty level so for the most part, we have an 8-inch footing everywhere except one small length where it’s about 6 3/4 inches. The whole foundation will be setting on a structural rock bed which was originally tamped using a large vibratory roller and now has been further tamped, to compress the loose rock after digging, using a large diesel plate tamper.
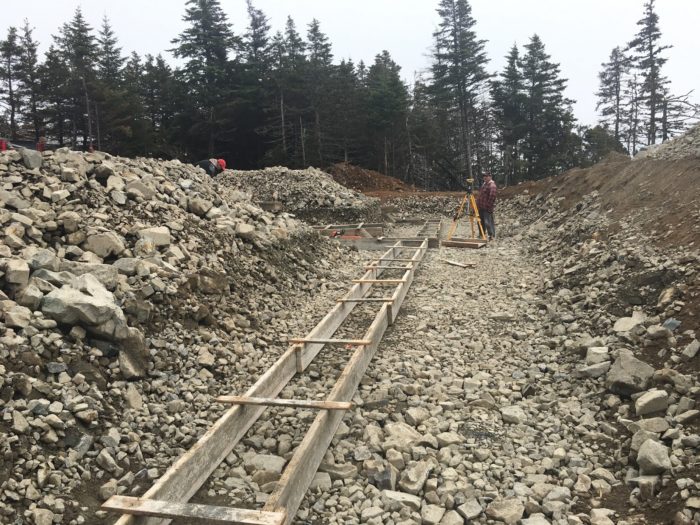
Although I was a little unsure about the leveling process, now that I have seen it, I realize it’s much simpler than I expected. The footing contractor lays out the forms according to the survey pins. Then he uses a transit to find the highest/lowest points (see Image #4 below). He goes to the corners and sights an elevation and pounds a nail into the inside of the form. Then on to another corner, or along the form, sighting elevations to match the previous. Then he snaps a chalk line between the nails on the inside of the forms and that gives them a measure of how much concrete to pour.
This work took about a day. The concrete got poured in less than 20 minutes (see Image #5 below). As the concrete was poured, one of the laborers followed behind leveling the footing to the lines with a shovel by moving the concrete around. Another guy followed, further flattening the concrete with the end of a rake.
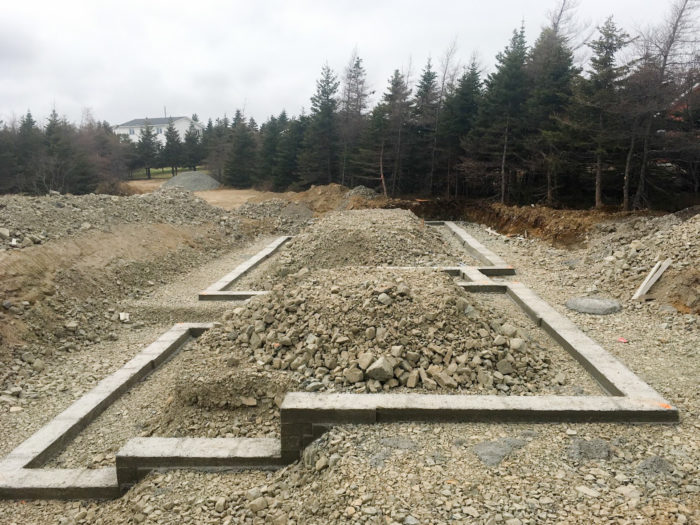
What you are left with is a poured footing, ready to set up overnight to a nice set of hard concrete footings: a solid foundation for the Flatrock Passive House (see Image #6 below).
Adding the frostwalls
Since the home design has been completed, I’ve been studying the drawings over and over again. Every couple of days I come across an interesting conundrum. This one is a tale of two foundations.
One of the principles of Passive House design is building an efficient envelope that is superinsulated, airtight, and thermal-bridge-free. If a foundation in a cold space is joined to a foundation in a heated space there are several potential issues. First, it provides a short circuit for heat to travel outside of the thermal envelope during heating season and for heat to enter the envelope during cooling season. This also could lead to interstitial condensation in the walls, promoting mold issues inside the wall at the junction of the short circuit. To minimize this transfer, the designer wanted to separate the thermal envelope of the house from the porch using 2 inches of EPS foam.
Because of the way the forms are connected it would have been possible to insert a piece of foam at the connection between the two foundations. However, once the concrete was poured there would be no guarantee the foam would stay in place. Additionally, there would be no way for the two foundations to be connected. So is there a way to do this using fancy Passive House materials? Probably. However, I had to work with what I have.
Our solution was two pours. The house foundation was poured first. The following day, the forms were removed and a piece of foam 8 inches wide was glued to the foundation at the point of connection between the two walls. We drilled holes through the foam and into the newly hardened concrete, then glued rebar into the holes with epoxy. The forms could then be set up and the concrete for the second foundation poured. The rebar makes a semi-rigid connection between the two foundations.
Calculating energy losses of thermal bridging
Is there an energy penalty for using rebar? There definitely is! It is a thermal bridge directly into the foundation. But since the heat flow is proportional to the area, one would expect the cross-section for several pieces of rebar to be much less than the area connecting the two walls.
Using some highly simplified assumptions, I determined that using the rebar has an energy penalty about 14 times less then leaving the concrete connected; it’s safe to assume the energy lost is about an order of magnitude less when using the rebar. Using data found online, I calculated the power lost through the rebar could be as high as 0.5 W/ degree C. So a temperature differential between the outside foundation and the inner foundation of 15° would mean an energy loss of about 7.5 watts. With the concrete walls joined together, the power lost through the wall would be about 9.2 W/ degree, equating to about 140 watts. Assuming the temperature differential between the foundations is at least 15°C for one-third of the year, this equates to almost 400 kWh of energy, or about $40 on my electricity bill.
This is significant and has a short payback for the time invested. But keep in mind there are a lot of assumptions here. The total energy savings is really still a question left up to energy modeling. But for the cost of rebar, epoxy, a masonry drill bit (about $70), and some minor inconvenience associated with doing two pours, I figured it was worth it.
Weekly Newsletter
Get building science and energy efficiency advice, plus special offers, in your inbox.


11 Comments
Serious question
Did your foundation contractor think you were/are nuts? As you found out, forming footings takes about 95% of the time... pouring is (usually) pretty fast. So asking the mason to come back a second day for an even smaller pour would have led the masons I've used in the past to give me "the look" - you know, the one that says "wt% are you thinking? THAT"S gonna cost you."
My build in northern California is still months away, and will be my first project where energy sensibility is a driver of subcontractor choice. I'm imagining that when I tell prospective masons that I want to put an inch of foam under the rat slab in a crawlspace, about half of them are going to bow out and the rest are going to jack the price up, How did your guy take to splitting up the pour?
Rob,
I have managed to find
Rob,
I have managed to find trades with open minds! This being said, our province is in a bit of a building slump and contractors are doing anything they can to please! There was a time when guys were pouring up to 3 foundations per week. Now they are pouring one! They did think I was crazy but once I mapped out why, and showed them the energy penalty they understood. As the guys were stripping down the house foundation, I was drilling for rebar to connect the two. Once I was finished, they were already erecting the foundation walls on the garage. It wasn't that big of a deal to them and they charged me per linear foot as per the agreed price. But like I said, they only had one pour that week so maybe the situation would have been different if they had more foundations to pour. Hope this helps.
Structural Fill
David,
The problem is almost certainly mine, but I can't quite get my head around the necessity for the structural fill. Typically when we build in similar conditions, we remove the organic matter until we find undisturbed soil, then form and pour the footings and foundation walls, and backfill. At that point the fill is added to either just above the footings for a crawlspace, or to the top of the walls for a slab. Was there something about the soils that necessitated the structural fill and sequence you used?
It's All A Bit Late to be Asking Questions
I must admit that I am a bit disappointed in this series of blogs. When I first read your blog dated July 4th 2017 I was given the impression that you were "just finishing up the final, final plan (hopefully) and were about to look at possible changes as suggested by your first "energy modeling tests".
As it turned out, you were already half way through the framing so all the suggestions I had made (as well as everyone else's) were really a complete waste of time. Now you have people asking questions in this blog posting about your footings and foundations. They're already been poured and are finished. What can be changed or improved at this point?
Perhaps the tone of future blogs could be changed from "this is what we're planning to do" to "this is what we've built" so that readers know that it's already too late to offer suggestions or ideas.
Advice
Scott,
In all fairness there are all sorts of clues as to where the process the project is, including a link to his blog, and if you go back to the thread in which you gave all the design advice, you will find a post from me pointing out it was too far along to be go any help. I'm not sure you understand the difference between the Question and Answer section and the Blogs where the intention is to chronicle a build, not solicit advice.
Structural fill
Hi Malcom,
There were some particularly challenging aspects about this side...especially for a slab on grade. I knew up front that we were on a south sloping lot. However I didn't realize how sloping it was. Although the slope didn't appear to be too bad, the problem was that as we dug, we realized there was a large amount of top soil and the ground was sandy. eventually, in one corner of the lot we had reached a depth of 7' below the natural grade. However in order for us to have the grade on our front yard the way we wanted it, it involved bringing in fill to bring the whole structure upwards otherwise my frost walls would have been more than 8' tall!. Originally we were aiming for a 4' frost wall around the structure . If we backfilled so that the footings were 4' under, I was going to have an 8' embankment at the rear yard. It was a bit of a mess to contend with. I also knew that the inside of the foundation was going to have to be filled in order to pour the slab on grade. A local geotechnical engineer said that if we can get blast rock at a good price it would be easiest to fill the hole in 1-2' lifts compacting in between, then dig new footings. We built up 4'-5', then dug the stepped footings. The blast rock dug for the footing was moved to the centre of the foundation knowing it was going to have to be filled for the slab anyways. With a stepped footing at the back of the house and a 8' frost wall, about 3.5' of foundation wall was left above ground decreasing the size of the embankment at the rear of the home....As i plan on using most of my property for vegetables its going to be much easier now to work with.
At the time it seemed like the best option we had and it worked. I now realize that even small changes in grade can lead to challenges with slab on grade construction and that sloping lots can certainly influence cost estimates for the foundation. This being said, I'm not sure it would have been any simpler doing it in another way. The way we chose to do it allowed for heavily compacted ground under most of the slab...I am hoping that this will mean that there will be very little settling over time.
I am pleased with the final product. I think my cost estimate was out by about 15% on the foundation component, including excavation, fill, concrete, etc.
It's All A Bit Late to be Asking Questions
Hi Scott,
I am sorry that you are disappointed. Like many people documenting their builds, it involves a huge amount of time to write and document the construction process. I have been documenting this process since January. As Malcolm has mentioned there have been several clues as to the current state of the project, including a link to the blog as well as several times when I have mentioned that the "horse is out of the barn" on several of the comments....
This all being said, I did appreciate your involvement in the last post. In fact, there are several things that we are now changing based on your commentary. Although somethings couldn't be changed, others are possible.
With respect to the comment about the "tone of future blogs"; my blogs are already written, GBA asked for permission to publish them on their website starting from the beginning. I can only assume that they will eventually catch up with my postings since my writing has slowed down to about a posting per week now that construction has become more taxing on my time schedule. I also hope that GBA readers find the information useful for self builds. I know that website traffic has increased considerably since GBA has been posting my blog articles.
Timeline
Ah, so that’s why Martin Holladay wrote: As they used to say at the end of each episode of a radio serial, "Tune in next week." All will be revealed in due time. All the blogs have already been submitted to the forum and they are being released on a set schedule. I was wondering why you weren’t getting more feedback from the “Green Building Advisor” experts but I guess it was because they already knew it was too late to really make any changes.
Still, rather than “clues” being hinted at (like the blog was a chapter from a weekly newspaper murder mystery novel) it would have been better to have written at the top of your first blog “We’ve started our build this January on Newfoundland’s First Passive House. Here’s what we did”.
That aside, what changes did you wind up making to your plan?
David
Thanks. The explanation was in your blog, I just didn't understand it. Makes sense.
To Detail Your South Facing Window Overhang
http://www.finehomebuilding.com/2011/01/20/window-shading. By Martin Holladay
Scott
Luckily I have a subscription to fine homebuilding. I had not seen this but it provides some good options. I have also been thinking about attaching wooden brackets made with 4x4s and a 2x4 knee brace . This would be attached to a vertical ledger. I would use 4 brackets lag screwed to solid blocking behind the foam wall exterior and then the shading structure would sit on top. I now have several options. Thanks for the input.
Log in or create an account to post a comment.
Sign up Log in