
Image Credit: David Goodyear
Image Credit: David Goodyear A drywall lift simplified the installation of OSB on the ceiling. To seal the seams between sheets of OSB, we used acoustical sealant, 3M tape, primer and a J-roller. A self-adhering butyl flashing tape called Blueskin was used on floor-wall and wall-ceiling connections. 3M tape was too floppy to use in the corners, but when folded and cut as shown here Blueskin worked well. After the corner has been primed and the seams filled with acoustical sealant, the folded corner piece can be installed. Seams between sheets are sealed with 3M tape. Top and bottom edges, and vertical corner seams, get a layer of self-adhering Blueskin tape. The job was complicated by the need for 3-inch strips of OSB at the top of the wall. We used a two-part spray foam kit to seal the area behind the rim joists. It took a bit or practice to apply the two-part spray foam around the rim joists. We applied the foam in two lifts to get a finish thickness of about 2 inches. Sealing around ducts for the energy recovery ventilator was one of the last steps in air-sealing the house. Acoustical sealant was followed by a gasket and flashing tape.
More Guest Blogs


Editor’s Note: This is one of a series of blogs by David Goodyear describing the construction of his new home in Flatrock, Newfoundland, the first in the province built to the Passive House standard. The first installment of the GBA blog series was titled An Introduction to the Flatrock Passive House. For a list of Goodyear’s earlier blogs on this site, see the “Related Articles” sidebar below; you’ll find his complete blog here.
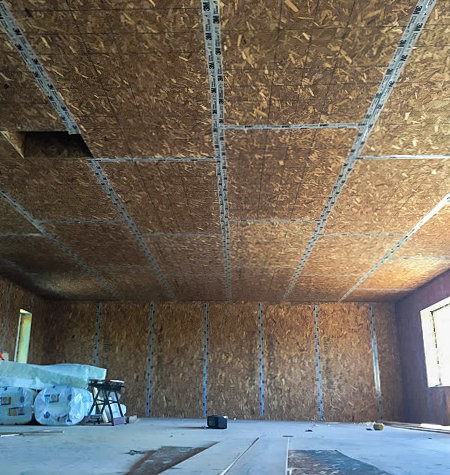
In the previous post we were beginning to install the OSB air barrier on the interior side of the 2×8 stud walls. Once all joints are caulked with acoustical sealant and then taped, the OSB will act as both an air barrier and a vapor retarder.
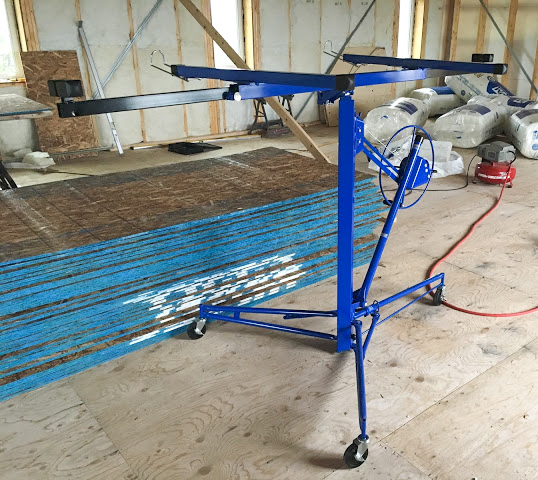
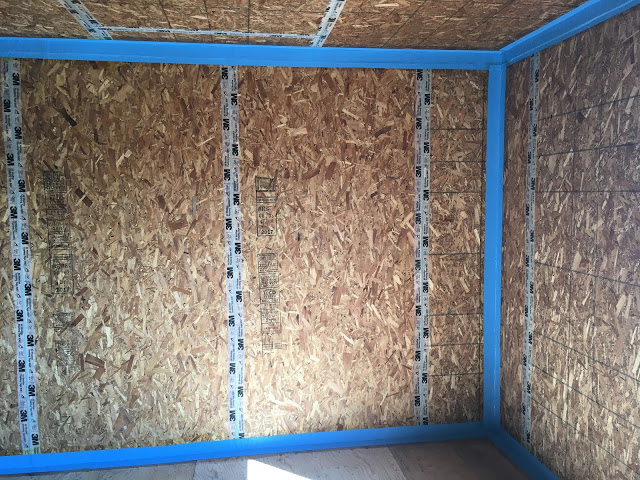
It didn’t take long to decide that lifting these heavy sheets (each sheet of 1/2-inch OSB weighs about 46 pounds) and attaching them to the ceiling using muscle power and a dead man support was out of the question. Our local Princess Auto had a drywall lift on sale so we bought it (see Image #2 below).
We started in one corner of the building. One person on a ladder guiding the other where to push the drywall lift loaded with a sheet of OSB worked great. Our first sheet was cut so that the edge of the sheet could be nailed under the underside of the roof truss. Using a framing nailer armed with 2 3/8-inch nails was the way to go. A hammer and nails was just frustrating. The second run of OSB was offset so the joints were staggered. There were 42 sheets of OSB in the ceiling, which took about eight hours for us to complete.
After the ceiling was complete, the next task was to install the OSB on the walls. Luckily we already had a plan in place for this because we had completed the installation on the main level. The batt insulation had already been installed upstairs so all we had to do was start at one corner and install the sheet goods one at a time.
The trick was to angle the bottom of the sheet against the bottom wall plate, wedge it with a foot and use hand force to compress the insulation while pushing the OSB in place against the studs. Nailing initially (with a framing nailer) at the plate holds the sheet in place. Working our way across and up the sheet with nails on 24-inch centers completed the job. If we overlapped with a window we found that scribing around windows and then cutting to fit worked best.
Sealing the seams
After the OSB was fastened it was time to start air-sealing the seams. The technique is straightforward: simply caulk the seam with a 1/4-inch bead of acoustical sealant and then roll 3M 8067 tape on top (see Image #3 below). After rolling the tape I used a J-roller to apply pressure to the tape and the bead of acoustical sealant. This flattens the acoustical sealant and pushes it into the seam. The walls were completed using the same procedure.
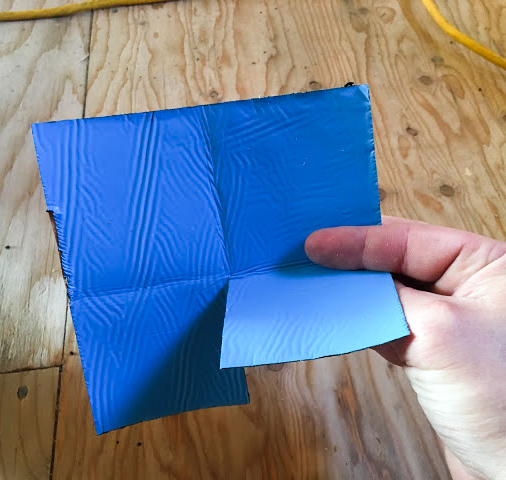
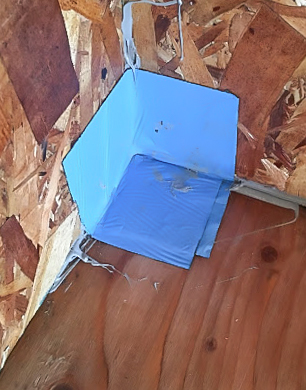
Corners… those darn corners! They are a real pain to work with. The 3M tape is too floppy to work with in a corner. Blueskin, on the other hand, is pretty easy in comparison. First, the corner was primed with Bakor Hi Tac Primer. To make an inside corner I simply cut a square of Blueskin, and ran a half cut through the center. After a simple fold it was ready for install (see Images #4 and #5 below).
There was an interesting conundrum with the upstairs wall. The OSB is attached to the bottom side of the trusses, then strapped with 2×4 before drywall is attached. In order for the ceiling to be the right height for drywall and to allow for about 1/2 inch of play at the bottom, the exterior wall had to be about 99 1/8 inches high. This height is not standard. Because of this, a single sheet of OSB wasn’t high enough to reach to the top of the wall. We had to add a 3-inch-wide strip all the way around the top of the 2×8 wall. This lead to a minor problem: How to seal the upper corner of the wall with Blueskin? My plan was to run the Blueskin 4 inches down the wall and 2 inches onto the ceiling. This would effectively cover two joints at the one time.
Blueskin doesn’t have a split paper backing. Using a straightedge, I could score the paper backing if I cut lightly with a utility knife. 3M tape was too hard to work with in the corners. Blueskin is firmer and easier to place. We came up with a two-person system that allowed us to lay about 8 to 10 feet at a time. We primed the surface with Bakor Hi Tac Primer before applying the self-adhering membrane.
The key here is to work slowly and methodically. Trying to rush leads to a bad installation with a lot wrinkles and folds. Even working slowly allows some folding. With some experience working with the material, we eventually were able to minimize wrinkling, mainly through careful observation as we were applying the tape. Overall the installation went pretty smoothly (see Image #6).
Sealing around windows and doors
With the date for our blower-door test set within the coming week, we had some major work to complete with air sealing around the windows and doors. Like all of the details for the air barrier, there is a redundant system for air sealing. First, the gap between the window and the buck gets a good bead of spray foam. This will provide some air sealing as well as some insulation to the gap. Next, a backer rod is installed. Finally, the backer rod is caulked to the door jambs/header and the window buck.
Overall, its not a hard detail to implement… unless there’s not enough space between the window frame and the buck.
When the windows were installed, we worked to ensure there was an even space all the way around. Don’t trick yourself into thinking that framing is accurate. It is not. Once a square window goes into a framed opening we quickly saw the bucks weren’t as square as the windows. We had to rob space at one corner of the window in order to get an even space at the opposite diagonal corner. With the longest window (9 feet), this lead to a 1/4-inch gap at the window corner.

My experience with the window installation is that Kohler doesn’t provide for enough space when specifying windows. They specified the rough opening should be 3/4 inches larger than the window frame. With framing inaccuracies being anywhere from 1/8 inch to 1/4 inch (especially as studs are drying, cupping, and warping), that’s simply not enough room to play with. A full inch would be better and would lead to a better installation, with gaps wide enough to work with.
In any case, I had no other option but to work with the space left. Luckily, my spray foam gun has tips which can be inserted into fairly narrow openings. The big issue is seeing how much spray foam you are actually applying to the space between the buck and the window. Using a flashlight helps, but with really deep bucks it was really hard to see. I was using a low-expansion foam so I just had to spray enough so the bead touched the window/door and the buck.
After some expansion there was still enough room to push backer rod in place. We caulked the backer rod to the door and the stud opening. For large gaps, we opted to caulk one side of the backer rod to the window/door and caulk the other side to the stud opening. On gaps smaller than 3/8 inch, the gap was filled with caulk.
Because of the uneven spacing between the windows and the bucks, we needed a selection of backer rod. I picked up backer rod with thicknesses from 3/8 inch to 3/4 inch for the windows. Backer rod should be about 1/8 inch larger than the gap it’s filling in order for it to be effective. The rod should compress enough that it stays in place. Working around the window I transitioned from one size backer rod to another, pushing it in place with my fingers first and then pushing it firmly against the spray foam using a 4-inch broad knife.
It is really amazing how effective backer rod is. The gap at the bottom of one of the sills was too narrow to spray foam. Because the bottom of the window was not caulked (for drainage) we could feel air entering the building from outside (it was a particularly windy day again). My only option here was to insert layers of backer rod. Pushing lengths of backer rod into the gap immediately stopped the air from entering, so I know it is doing the job it was meant to do.
Air-sealing the rim joists
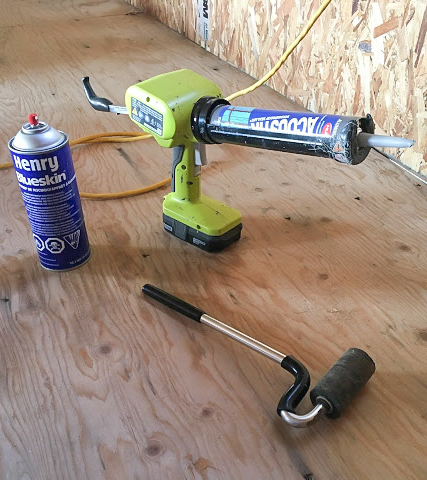
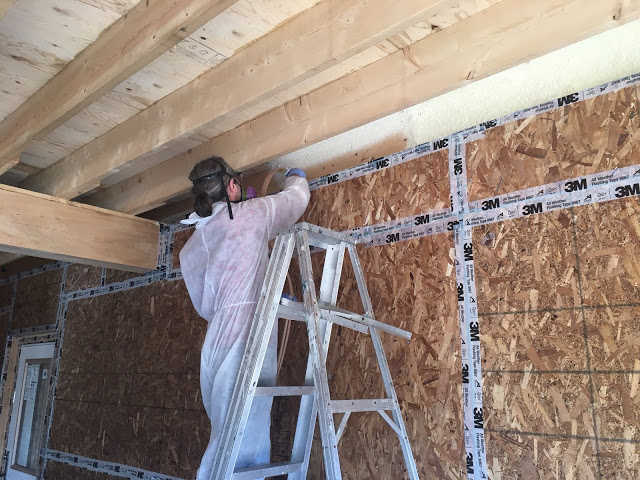
Air-sealing the rim joists called for a two-component spray foam (see Image #7 below). Initially, I was going to get a contractor to do this for me. However, after exploring my options, I decided to do it myself. We used a 600-board-foot kit that we purchased at our local Home Depot. We were equipped with a disposable suit, a respirator, safety glasses, and a set of nitrile gloves.
Working in the rim joist space is difficult. Space is limited, which makes it hard to orient the spray gun and also makes it hard to see where you are spraying. It took some time to get the application right. Spraying on 1/4 inch to 3/8 inch gives about 1 inch when the foam has fully expanded.
We sprayed the corners first then the surfaces as specified in the instructions. We sprayed a second coat after a couple of hours to ensure we had about 2 inches of foam as specified in my construction drawings (see Image #8 below). Spray foam can suffer from issues during the curing process, which can lead to non-uniform R-values. In places where the foam was protruding, I cut it off to inspect the quality. The pieces that were cut were randomly sampled. The inside of the the samples looked almost like XPS insulation. There were no large voids or bubbles so I am pretty confident that the application was good. Spray foam is expensive but about half the price if you do it yourself.
A few final details
Some final details included sealing around the ERV duct vents (see Image #9 below). First, I applied a bead of acoustical sealant around the duct, sealing it to the OSB sheathing. Next was a Roflex gasket from 475 High Performance Building Supply, pushed back to the OSB and tape-sealed with 3M 8067. The same application was completed for our wood stove air intake.
In preparation for the blower door test, all duct openings, pipe stubs, etc, were sealed with tape and plastic. According to my Passive House designer, the area included in the thermal boundary is 5,906.8 square feet. Based on the PHIUS standard, I need to hit 0.05 cfm/sq. ft. for a total of 295.34 CFM at 50 pascals of depressurization. This is a hard target to meet but I feel that we have implemented the air-sealing details accurately, so we are hopeful!
With the air-sealing details completed, we feel a sense of accomplishment and a sense of uncertainty.
Weekly Newsletter
Get building science and energy efficiency advice, plus special offers, in your inbox.


11 Comments
David
How did you deal with electrical boxes in the OSB? With drywall you can use a rotary bit to cut them out when the sheets are hung.
A Question.
In reading through the article there was plenty of information on the installation of the OSB but I didn't see anything about WHY you were using OSB as the interior air barrier. Why wouldn't you use an airtight drywall approach?
Also ,aren't there fire code requirements for an interior finish? Does OSB qualify, or will you have to cover the OSB with fire resistant drywall too?
Some Additional Info
http://www.ecohome.net/guide/interior-sheathing-air-vapour-barrier
Scott,
I can't off-hand remember the flame spread rating of OSB, but from the pictures it appears David is going to cover it with drywall. All drywall have a sufficiently low FSR. It doesn't need to be fire-rated.
@ malcom, @Scott
Hey Malcolm, I didn't have to deal with any electrical penetrations through the OSB except to the exterior for exterior lights and plugs (more to come on that). THere is another 2x4 interior service wall to be erected after all the air sealing is completed. More to come in future installments!
Scott, as Malcolm mentioned, there will be drywall at the interior side of the service wall so no need for any fire rating on the OSB. Carrying the air/vapor retarding barrier continiously up the walls and through to the rim joists and ceilings is much easier using this method than the air tight drywall approach I would think. transitioning between floors and between rim joists must be difficult using the drywall approach. In anycase, I really didn't have a choice in that matter. I follow though on the designers specifications.
Service Wall
The only reason I can see for building a secondary interior service wall is to have a place to run your electrical wiring without having to puncture the OSB wall layer. It seems like a lot of extra building material just for outlets and switches. Can you use a baseboard raceway for your wiring and electrical outlets?
https://www.legrand.ca/categories/wireandcablemanagement/raceways/nonmetallic-raceway.aspx
Scott
Not having jumped ahead in David's blog I don't know what his intentions are, but if the service wall is insulated, you in effect end up with a double wall assembly.
I'm with you though. Unless service cavities are designed for the actual services that need to be routed, like say Stephen Sheehy's dropped portion of the ceiling for ducts and equipment, It often seems more like a good idea than something of practical value.
Scott, as malcolm pointed
Scott, as malcolm pointed out, this is a double wall assembly. The inside wall will have services as well as insulation. There is more going on here than just a space to run services like wiring, plumbing, and ductwork. In order to achieve the levels of R-value required for passive house, double wall assemblies are often required. Depending on the climate zone, the placement of the vapor retarder (also air barrier in this case) can influence the physics of the wall dramatically. In a climate dominated by heating and some cooling (I'm in zone 6a) it is often better to have that layer somewhere around 1/3 of the R-value from the inside. It provides the wall system with a pathway to dry in both directions, as long as the layers have some vapor permeability. There is an added benefit of the service wall studs not being aligned to the exterior wall studs so there is less thermal bridging. Having the continuous air barrier somewhere in the middle of the wall also has better long term performance. Houses don't come with user manuals, and because they don't, people drill holes, hang pictures, run new wiring, etc on exterior walls and make a swiss cheese air barrier in their wall assembly. Every hole cost more money to heat/cool.
I have seen the baseboard raceways before. More cost effective site built options exist through the use of strapping and wide baseboard mouldings. This is often used in timberframe construction where it becomes hard to run wires through hard to reach areas. Dedicated chases are used as a backbone to route wires to a given area where they can then enter the raceway. This system limits the possible routes to get power from one area to another and can use more wire if not pre planned. Although the system could work, in Newfoundland this would be a highly specialized installation and I'm pretty sure that one of two things would happen; either #1: Nobody doing residential work would consider providing a quote or #2 I would loose my shirt paying somebody to install it because they would quote this job much higher than running the wire conventionally. Besides, it's not available locally, which means if you run out of supplies you can't go to the hardware store (for me 10 mins away) to pick up more.
A service wall is easy, familiar to the framers, and definitely made my life easier. It took 2 days to erect and used about 200 studs. the cost for framing and studs was about $2000 CAD.
Service cavities
GBA readers who are curious about service cavities may wish to read this article: Service Cavities for Wiring and Plumbing.
Martin
In reading through your article about Service cavities for Wiring and Plumbing I see a lot of good points for having one. I can also see how the addition of an OSB layer inside the main wall structure can function as an efficient air barrier but I was wondering about its use as a vapor retarder. I'm assuming the comment made by Albert Rooks refers to moisture getting into the service cavity from the interior but how do you detail the exterior of the structural wall?
Do you still seal the exterior of the building with another layer of OSB or plywood and then cover that with a vapor retarder (such as those roll on products from Stoguard)? And should you also consider using exterior rigid foam or perhaps Roxul Comfortbatt on top of the exterior sheating or would that trap moisture within the structural wall?
What layers and products would you recommend for a building that includes a service cavity?
Response to Scott Wilson
First, a note to GBA readers: Scott's comment don't refer to the article where he posted his comment. His comment belongs on another page. This is the article he is talking about: Service Cavities for Wiring and Plumbing.
Scott,
Although I interviewed a lot of builders who like to create service cavities when I wrote the article you're talking about, I'm not advocating their use. To learn about my own recommendations, see this article: "How to Design a Wall."
Q. "How do you detail the exterior of the structural wall? Do you still seal the exterior of the building with another layer of OSB or plywood and then cover that with a vapor retarder (such as those roll on products from Stoguard)?"
A. Builders who install OSB in the center of a deep wall cavity have two choices: They can use a conventional sheathing on the exterior of the building (usually OSB or plywood), or they can install housewrap on the exterior of their studs without any sheathing. I'm not a big fan of the "just install housewrap without exterior sheathing" approach.
Q. "Do you still seal the exterior of the building with another layer of OSB or plywood and then cover that with a vapor retarder?"
A. You definitely don't want an exterior vapor barrier. Nor do you want a vapor retarder. Most brands of housewrap are vapor-permeable.
Q. "Should you also consider using exterior rigid foam or perhaps Roxul Comfortbatt on top of the exterior sheathing or would that trap moisture within the structural wall?"
A. Installing exterior rigid foam is a perfectly acceptable approach, and using exterior rigid foam doesn't "trap moisture" as long as you follow a few basic rules. For more information on exterior rigid foam, see these two articles:
Calculating the Minimum Thickness of Rigid Foam Sheathing
Combining Exterior Rigid Foam With Fluffy Insulation
There is also an extensive discussion of exterior rigid foam in the article I linked to earlier ("How to Design a Wall"). This last article also has guidelines for the use of exterior mineral wool.
Log in or create an account to post a comment.
Sign up Log in