

Image Credit: Energy Vanguard
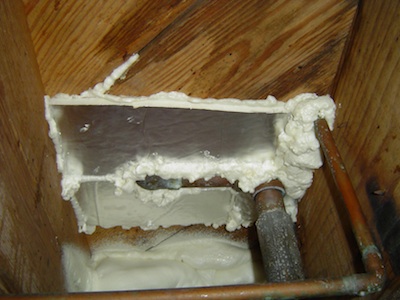
Image Credit: Energy Vanguard Sealing the bathtub hole eliminates a big hole down low.
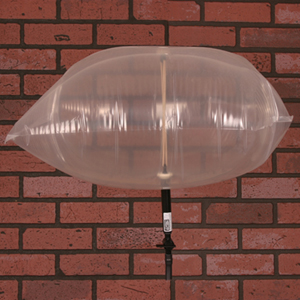
Image Credit: Energy Vanguard The Chimney Balloon can cut your air leakage dramatically if you have an old home with a fireplace that has no damper.
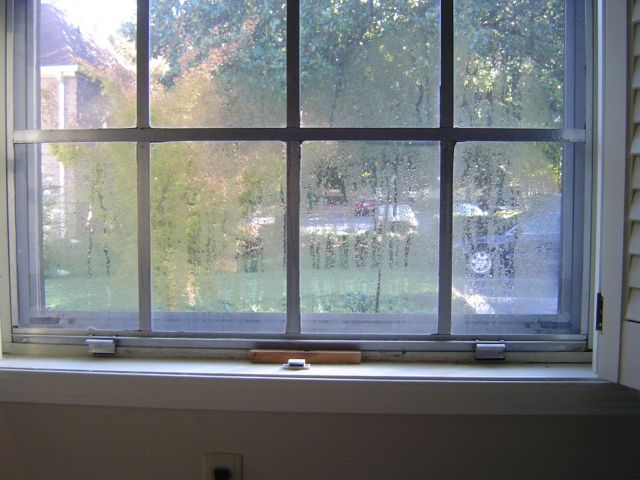
Image Credit: Chimney Balloon Window condensation is a common problem with older windows, especially single pane windows. Putting another layer of material on the inside can help, and Indow Windows do that elegantly.
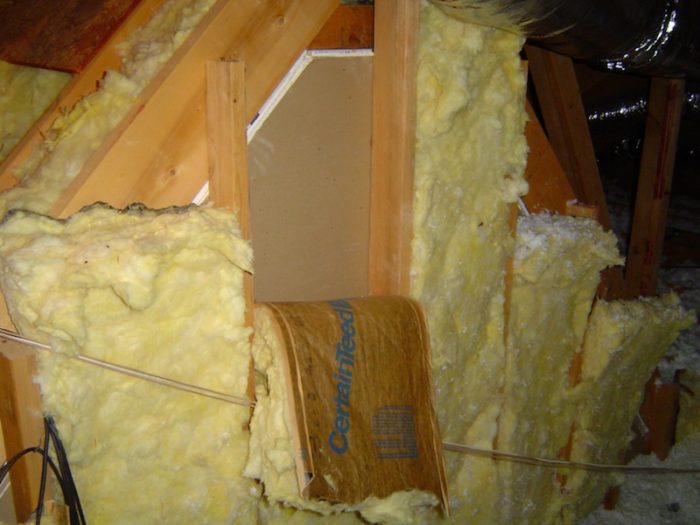
Image Credit: Energy Vanguard This attic kneewall is typical. The insulation is falling out. There's no attic-side sheathing. The room on the other side is likely to be uncomfortable.
Image Credit: Energy Vanguard
More Building Science


Of course, everyone knows that caulking your windows and weatherstripping your doors won’t help you much. Right?
Well, all the cool kids do anyway, and that includes you because you’re here reading this article. A lot of the standard advice on getting your home ready for winter is filled with bunk. That includes the stuff that comes from many utility companies and famous people who try to help you save money, like Clark Howard. But what should you really do to prepare your home for an efficient and cozy winter?
Today, I’ll give you some tips that will be much more effective than caulking the windows. Ready?
1. Identify your pain
What’s your motivation for wanting to do something about your home? Are you dreading getting those utility bills? Do you have rooms that you just can’t use in winter? Does your house start smelling musty? Does that condensation on the windows bother you?
The first step is to identify your pain because that’s where you’ll find the motivation to do anything about the problems. It’s also critical in identifying the sources of those problems.
2. Assess your ability and bring in the pros
First, a little Building Science 101: A house is a system. If you don’t understand how all the pieces work together, don’t try to do too much yourself. A lot of DIYers with great intentions end up costing themselves more money or even poisoning their families because they don’t understand the potential impacts of changes they make.
For example, if you have a natural draft water heater in the laundry room, sealing up that room could cause backdrafting and put carbon monoxide into the air inside the home. Even worse, he most likely time for this to happen is when the family goes to bed at night and closes the bedroom doors.
Hey, I hope to die in my sleep, but I want it to happen when I’m old and feeble. (I sometimes tell people I want to die peacefully in my sleep, just like my grandfather… not screaming in terror like the people who were in the car with him. That’s a terrible joke, though, and if you get in trouble for it, don’t tell them you got it from me.)
Anyway, changing the filter in your heating system or making other minor changes is probably OK, but if you’re making significant changes, hire a pro. Certified BPI Building Analysts or RESNET Home Energy Raters can help.
3. Fix the big leaks at the top and bottom
This was the focus of my article last week. That’s where the bigger holes are and that’s where the bigger pressure differences are. You’ll stop a lot more air leakage by fixing them first. The photo below shows how I sealed up the bathtub hole in a house.
4. Install a Chimney Balloon (or similar product)
One of the biggest holes in many older homes is the chimney. Some older fireplaces have no damper, and a lot of air can leak in or out of the house there. The Chimney Balloon is a great product for filling that hole and reducing air leakage and drafts.
Jeffrey Sauls here at Energy Vanguard put one in his house and cut his measured air leakage by nearly 20% with just that one measure. (His blower door result went from 5,700 cfm50 to 4,700 cfm50.)
5. Get fitted for Indow Windows
Does condensation collect on your windows? If you have single pane windows, the glass will be very cold in winter. When the dew point of the air in your home is higher than the window temperature, your window becomes a dehumidifier.
One way to solve that problem is to put another surface between the window and the home’s air. Plastic films have been around for decades to help with this. I’ve even seen some winterization articles suggest using bubble wrap.
A much more elegant way to do it, though, would be to use Indow Windows. These are basically interior storm windows that make a nice snug seal in the window frame. They help prevent condensation as well as reduce heat loss through the windows.
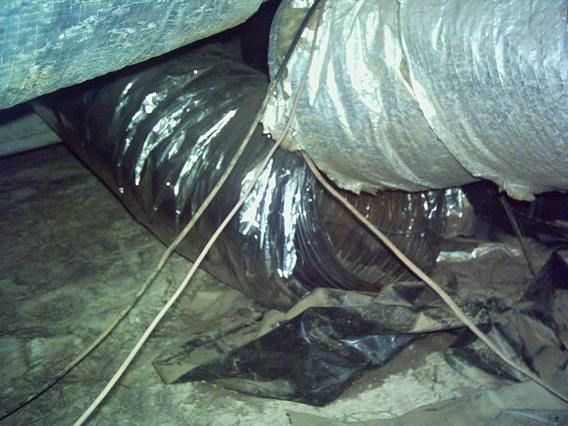
6. Fix any disconnected ducts
That photo of the disconnected duct at the top of the article is one of many in my collection. This is not an uncommon failure in homes. When all or most of the heated air that’s supposed to be going to a room is instead dumped into the attic, crawl space, or basement, you have a big opportunity to improve your comfort and cut your heating bills. If you’re in snow country, you also might solve or reduce your ice dam problem.
7. Get rid of unvented space heaters
I’ve been writing about this since the beginning of this blog. Unvented combustion space heaters put a lot of water vapor into your home’s air. They have the potential to put carbon monoxide into the air, too. They’re just not a good idea at all. If you really want to use a space heater, get an electric one. If you heat your entire home with unvented space heaters, it’s time to consider upgrading to a safer and more efficient system.
8. Make your attic insulation flat, not lumpy
The same amount of insulation in your attic can either drain your wallet and keep your cold, or save you money and keep you warm. It depends on how it’s installed. Ideally, the insulation should provide a complete and uniform coverage. If it’s lumpy, you’ll have a lot more heat loss.
See my Flat or Lumpy article for details.
9. Insulate your attic hatch or pull-down stairs
One little, tiny bit of uninsulated area in your attic can result in a mind-blowing reduction in your average R-value. If you’ve got R-30 over 99% of your attic and have only 1%, which could be the attic hatch, at R-1, your average R-value drops to R-23. If you have R-38 over 99% of the attic and R-1 for that last 1%, your average R-value is a mere R-27. The same applies to other uninsulated parts of your home.
If your mind blown?
10. Fix the attic kneewalls
Ah, attic kneewalls. They’re often one of the weakest parts of a home’s building enclosure. The insulation is falling out. Holes go right through to the attic. The doors aren’t sealed. Even with a comfortable air temperature in the room with attic kneewalls, you may be uncomfortable because the walls themselves get so darned cold in winter.
What you need to do is:
- Seal all the air leaks
- Fill the cavities with insulation (ideally installed to Grade 1)
- Put a rigid sheathing material on the attic side of the wall
This isn’t a complete list of tips, of course, but it’s a good start. Again, though, let me encourage you to hire a pro. They can look at the house as a system and see things you might not have thought of. They also have equipment and tools that most homeowners don’t have and can help you put your money and your efforts where they’ll do the most good. (By the way, if you’re looking for a more complete list of general tips, check out Sean Lintow’s blog article: Top 5 of 5: Getting ready for ole man winter.)
Here’s to a warm and cozy winter in your home!
Allison Bailes of Decatur, Georgia, is a speaker, writer, energy consultant, RESNET-certified trainer, and the author of the Energy Vanguard Blog. Check out his in-depth course, Mastering Building Science at Heatspring Learning Institute, and follow him on Twitter at @EnergyVanguard.
Weekly Newsletter
Get building science and energy efficiency advice, plus special offers, in your inbox.


One Comment
It's been mentioned several times on this site that interior storm windows cause condensation issues. I have historic single pane windows with permanent exterior aluminum storms. They're still leaky and the windows create a lot of condensation in the winter. What are the risks/benefits of adding Indow windows to this setup? Are there any additional risks to having both interior and exterior storm windows?
Log in or create an account to post a comment.
Sign up Log in