
Image Credit: Energy Vanguard
More Building Science


UPDATED on December 18, 2017 with a corrected energy savings table.
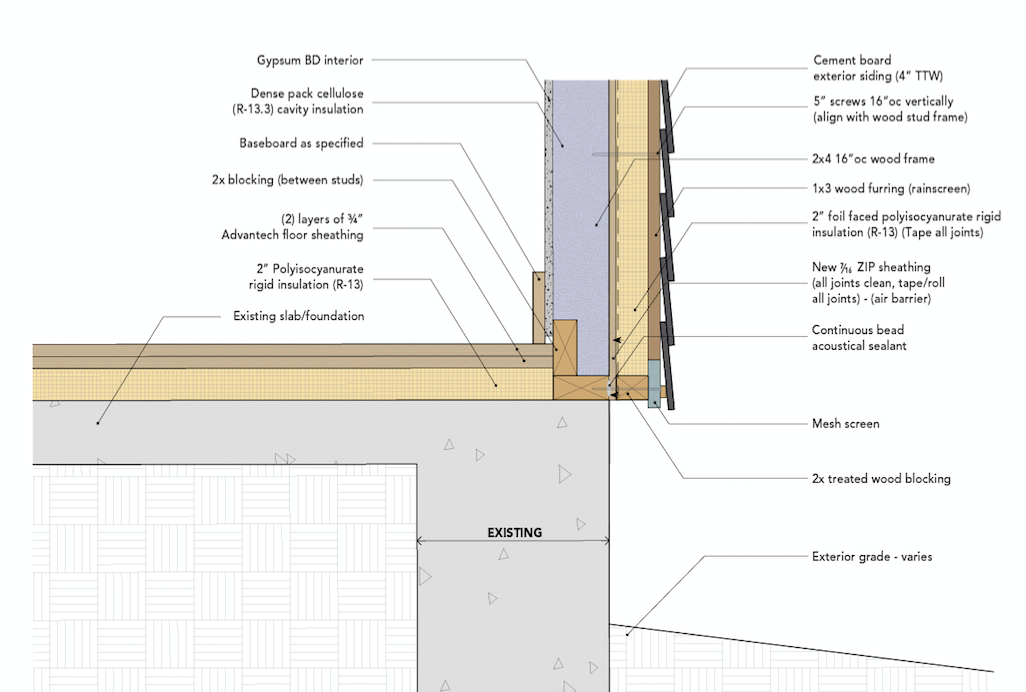
If you live in the world of 2×4 walls, as I do, you may have wondered about the savings you’d get by going to a more robust wall assembly. The typical house in southern climes has 2×4 walls with R-13 insulation in the cavities. The two ways to beef that up would be to add continuous exterior insulation or to go to a thicker wall. But which saves more energy? And how do they compare to the plain old 2×4 wall?
This question comes up fairly often in our HVAC design work. Clients want to know not only about how much energy they’ll save but also if they’ll be able to downsize the HVAC system. The former saves on operating cost, the latter on first cost.
Total R-value
A wall assembly is a combination of materials that allows heat to flow in both series and parallel. For this article, I’m going to show you the results I got for four different wall assemblies. First, I’ve set up a spreadsheet that calculates the total R-value of an assembly and then used that tool to calculate the R-values for these four walls. Here’s a summary of them:
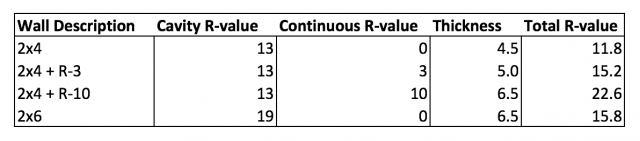
The first one is your standard 2×4 wall with plywood or OSB sheathing. The second one is the base wall plus half-inch, R-3 continuous exterior insulation. The third one is the base wall plus two-inch, R-10 continuous exterior insulation. The last one is a 2×6 wall with R-19 cavity insulation and no continuous exterior insulation.
The best R-value is the one with 2 inches of exterior insulation. The 2×6 wall is roughly equivalent to a 2×4 wall with a half-inch of exterior insulation.
HVAC design loads
To see what effect these different R-values have on the size of the heating and cooling systems in a home, we have to put in actual numbers for a house. I chose one that we worked on recently. It’s a typical house: two stories, 2,800 square feet of conditioned floor area, and about 2,400 square feet of wall area. I’ve got the file set up in RightSuite so I looked at the heating and cooling loads for the different walls shown in the table above.
But I also looked at the results for three different locations in 2×4 world: Decatur, Georgia (in the Atlanta area and where the house really is located); Dallas, Texas (a hotter climate); and Phoenix, Arizona (a climate so hot I don’t know why people live there — but hey, that’s their choice). Here’s what I got:
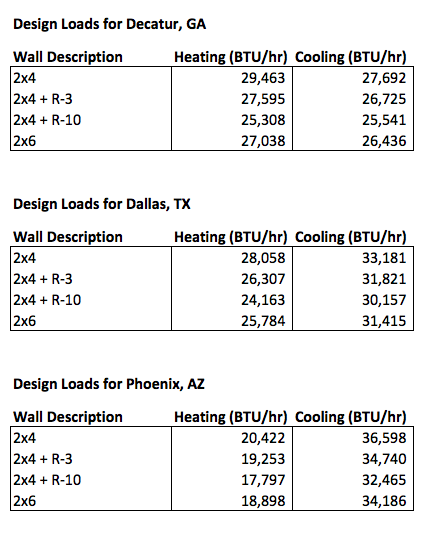
The design temperatures for the three locations were:
Decatur: 25°F and 91°F
Dallas: 28°F and 99°F
Phoenix: 42°F and 108°F
The results here show that the most reduction we can get in the design loads is about 4,000 BTU/hr. That’s about a third of a ton of cooling capacity. In other words, you’re not going to find much reduction in your equipment costs by adding exterior insulation or going from 2×4 to 2×6 walls. Dropping three to four thousand BTU/hr may allow you to move down one size in your equipment. Maybe.
Energy savings
Well, if you’re not going to save much on the first cost of your heating and air conditioning equipment, what about the energy you’ll save each year by reducing the heat transfer across your walls? Here’s what I found:
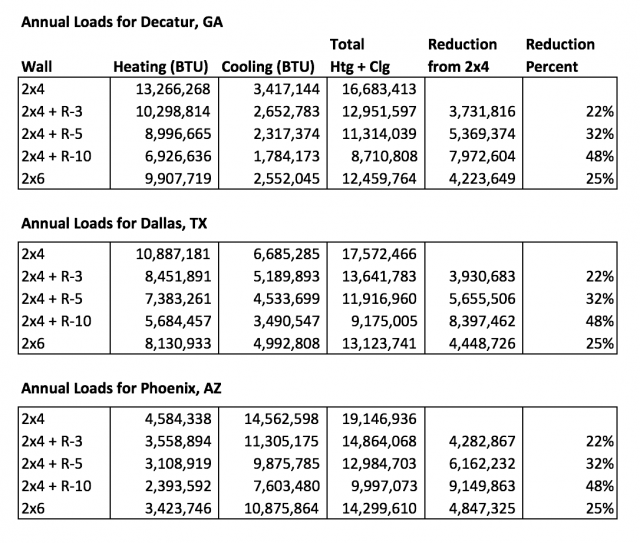
Note that I added another assembly here. In addition to the four above, I included the 2×4 wall with one inch of continuous exterior insulation with an R-value of 5.
The good news in these results is that adding more insulation to the walls saves hundreds of thousands of BTUs. The bad news is that the BTU is a pretty small unit of heat. If I had shown how many kilowatt-hours those BTU savings add up to, the number would be only about a hundred. That means you’re not going to save a lot of money by going beyond the standard R-13 wall in warmer climates.
But if we look at the percent reduction in heat transfer through the walls, it’s significant. The 2×4 wall with R-3 exterior insulation and the 2×6 wall both reduce the heat flow through walls by about a quarter (22% and 25% respectively). Going to the 2×4 wall with R-5 exterior insulation reduces your wall heat transfer by about a third. Going to 2 inches of exterior insulation on a 2×4 wall cuts your annual heat transfer through the walls in half.
Is it worth it?
The 2×4 wall with 2 inches of exterior insulation gets you the best results among the five assemblies I included here. You could, of course, add even more exterior insulation and reduce the heat transfer even more. Or you could go to a fatter wall without exterior insulation, such as a Joe Lstiburek’s ideal double-stud wall. Keep in mind, though, that each inch of thickness you add to the standard 2×4 wall increases your cost, and each successive inch buys you less and less reduction in your wall heat transfer.
With energy costs what they are now, none of the improved walls shown above in the three locations I chose will save you much money and may not even be cost-effective. But energy costs now in much the U.S. are really low. Will they stay this low as long as you’re in the house? Who knows?
If you’re in a warm climate and want to go beyond a standard 2×4 wall, you can do this analysis for your area and with your local energy costs to see if it’s cost-effective for you. Of the four improved walls above, the one that’s going to be the lowest cost is probably the 2×6 wall. It’s also the safest to build if you’ve got a framing crew that hasn’t done exterior insulation before. I don’t mean that your house could fall down if you build it with exterior insulation. I’m saying crews that have never done window bucks or attached siding over exterior insulation may have trouble with the details. But they can frame 2×6 walls.
There’s a learning curve with exterior insulation. If you have a crew that can deal with 2 inches of continuous exterior insulation, though, you can cut the heat transfer through your walls in half and still end up with walls the same thickness as 2×6 walls.
Other reasons to go beyond the 2×4 wall
For some people, the cost-effectiveness based on current energy costs determines whether an improved wall makes the cut. Or maybe it’s just how many dollars it adds to the bottom line. But let me steer you to some other reasons to consider an improved wall over a standard 2×4 wall.
First, there’s comfort. Whether you go with a 2×6 wall or a 2×4 wall with exterior insulation, that extra insulation means that the inside surfaces of your exterior walls won’t be as cold in winter or as warm in summer. Now, you may think that doesn’t matter a whole lot as long as your heating system or air conditioner is up to the task, but you’d be wrong.
As it turns out, air temperature is only one factor that affects our comfort. Another really important one is called mean radiant temperature. Anyone who’s ever walked around naked in poorly insulated house on a cold day has a visceral understanding of mean radiant temperature. Even if the air temperature is warm, cold walls (or windows) can suck the heat right out of you and leave you chilled. (My friend Robert Bean is the most persistent advocate for comfort I know. If you want to do a deep-dive into this topic, check out his website, Healthy Heating.)
Second, there’s carbon. Every BTU of carbon-intensive energy we save helps keep our atmospheric carbon dioxide from increasing further. Most places are using at least some dirty electricity because of the way electricity is shipped around the country among utilities. Reducing the amount of heating and cooling we need in buildings is one of the best ways to help reduce carbon emissions.
This article is targeted toward warm climates, so moisture accumulation in cold sheathing isn’t that big a deal. The colder your winters are, though, the more important it is to keep your exterior sheathing dry. Exterior insulation over the sheathing is great for that. One of the weaknesses of double-stud walls is that the sheathing stays colder and thus wetter, possibly even wet enough in cold climates to cause damage. (See my article on Building Science Corporation’s research on a house with double-stud walls.)
Where you may find more savings
If I were building a house for myself here in the mild climate of Georgia and were choosing from the wall assemblies above, I’d go with the 2×4 wall with 2 inches of continuous exterior insulation. I like the idea of cutting my wall heat transfer in half. But I’d also make sure I wasn’t do stupid things to negate the savings from the walls.
Here are the top three areas where the most stupid things happen:
- Windows – A good window is still a poor wall. A window that meets code here in Georgia has an R-value of about 3. That’s a heck of a lot less than the R-23 wall I just said I’d build, so I’d do two things. I’d install windows a good bit better than R-3. And more important, I’d make sure I didn’t have silly solar gain problems. Windows can kill you on your cooling loads, so you’ve got to pay attention to placement, overhangs, and sizes.
- Ducts – First of all, I’d have no ducts in the attic. Then I’d have no ducts in any other unconditioned spaces. Then I might not even have any ducts at all, at least for heating and cooling. And whatever ducts I do have would be designed properly, installed well, and commissioned completely.
- Foundation – A lot of comfort and moisture problems originate with the foundation, whether it’s a slab on grade, crawl space, or basement. The details matter. Even in a hot climate like central Texas, slab-edge insulation can save you a lot on heating. We’ve got a client building a Mediterranean style house with a lot of exposed slab perimeter. Slab-edge insulation would reduce their heating load by 25%. (And believe it or not, their heating load is higher than their cooling load.)
Whether or not you go for an improved wall assembly in a warm climate depends on your particular priorities. It’s not the slam dunk it is in a cold climate, but there are benefits.
Allison Bailes of Decatur, Georgia, is a speaker, writer, building science consultant, and the author of the Energy Vanguard Blog. You can follow him on Twitter at @EnergyVanguard.
Weekly Newsletter
Get building science and energy efficiency advice, plus special offers, in your inbox.


21 Comments
Installed cost
How does ZipR-12 compare with osb and 2" of exterior foam plus wrb on an installed basis?
Question on Comment 1
Is the WRB needed with 2" of exterior foam?
Response to Antonio Oliver
Antonio,
A water-resistive barrier (WRB) is required by code. In some cases, rigid foam can be used as a WRB, but there are limitations on that type of installation.
For more information, see Using Rigid Foam As a Water-Resistive Barrier.
Rigid foam bridging
Martin,
I'm wondering about the impacts of the rigid foam not being in complete (100%) contact with the underlying sheathing. My contractor is using 1x4 PT strapping fastened with screws to gusset the foam against the sheathing. In reviewing his work my experience has been that the center (unsupported) regions of foam bow out slightly say 1/16" - 3/16" of an inch. Does this gap present a problem in terms of the dew point the wall will be exposed to throughout the heating and cooling season? Of course, I'm worried about the wall surface (behind the foam and WRB becoming wetted should the dew point temperature be achieved. The wall in question is a old balloon framed 2x4 wall with blown in cellulose in the cavities. The exterior has upgraded with a vap-perm WRB and 2" of XPS.
Thanks for your feedback and thoughts.
Regards,
Patrick
Response to Patrick Netreba
Patrick,
The "bowing rigid foam" problem you describe is rare, but I don't doubt your observation. The key to good performance is to make sure that there are no air leaks between the rigid foam and the sheathing. This can be accomplished by installing each rectangle of rigid foam with a bead of caulk at the perimeter, between the rigid foam and the sheathing.
By the way: Furring strips say dry, so you don't need to use pressure-treated lumber for furring strips. Ordinary spruce, fir, or pine is just fine.
Rigid Foam Bridging
Martin...thanks much. Appreciate it.
One more comparison, please?
Awesome article, really sums up the options in an understandable way. And it focuses on warm climate building!
The tables would be even better IMHO if they included the typical (for California, anyway) 2x6 with 1" of hi-R foam - which meets the Calgreen 2020 R value requirements and eliminates thermal bridging. Any chance you could add that configuration, Mr. Bailes?
Roof and Air-tightness
Great article as always- Allison!
It seems that walls are often the most complex and expensive place to achieve lower u factors and therefore lower energy use.
As you pointed out, these Btus would drop further if some slab edge and under slab insulation was applied.
Roof/ceiling insulation can be cheap. An extra $1,500 of cellulose would likely bring the attic insulation to R-60 or more. Raised Heel trusses would add only slightly more. This would further reduce btus/hr.
Finally, taping the sheathing seams and adding gaskets would bring these number down further. I suspect you could get the heat loads down to around 18,000 btus/hour using the 2x4+R10 wall assembly in GA. Now you can use just two small mini splits on each floor for heating and cooling. Money saved!
Except not really because you'll need an ERV system :-)
orders of magnitude
"a hundred" x $0.13 = $13.00, not $1.30
I expect the intended meaning was a hundred dollars in annual savings, not a hundred kwh.
However the annual loads seem to be off by two orders of magnitude, but probably not three. (The annual heating wall losses of 2400 square feet of 2x4 /R12 wall in Decatur GA will add up many therms, not half a therm! It might be ~50 therms, not ~500 therms or ~5 therms. )
Wall Heat Loss
Q = U x A x (HDD +CDD)
I think the number in that chart show the result of that formula, but to get BTU/hr we need to multiply that by X 24 .... doing that will get you in the $300 savings from the standard to a +R10 wall.
Confused by KWH Savings
The article states
"The bad news is that the BTU is a pretty small unit of heat. If I had shown how many kilowatt-hours those BTU savings add up to, the number would be only about a hundred"
This is in the articles section of annual BTU usage for the wall assembly. Does this really mean at a rate of .13 per KwH its a $13 in annual savings from going form R13 2x4 to the best wall in the article, or am I missing a k for K somewhere?
Updated tables coming soon
I've been in contact with Allison Bailes by email on these questions. Allison acknowledges an error, and promises corrections soon.
Reply to Stephen Cook & Dana Dorsett
When I first set up the spreadsheet to do the annual load calculations, I was surprised to find the biggest reduction to be 112 kWh/yr for the home in Phoenix. And yes, at a rate of $0.13/kWh, the annual cost would be $13. But that assumes you're heating and cooling with equipment that has a coefficient of performance (COP) of one. If you use a heat pump with a COP of 3, your savings would be only a third of that. (The carbon reduction, however, would be based on about the original number since you give that factor of three back because of power plant and distribution losses.)
If you're heating with natural gas, the cost savings is even worse. At best, you save about 3 therms of gas. Here in Georgia, we pay less than 60 cents per therm so going from the standard 2x4 wall to a 2x4 wall with R-10 exterior insulation might save you two bucks.
But Dana's intuition is correct. I couldn't find a mistake in my calculations when I first put the spreadsheet together last week, even though I checked and rechecked, not comfortable with how low the numbers were. But I couldn't find it.
Having gone back and taken another look, I found my mistake. I forgot to multiply by 24 in that calculation with HDD and CDD. (That puts the results off by one order of magnitude, not two.) I'll get the tables corrected and reposted today.
Thanks for calling me on this, Stephen and Dana. I was hoping someone would help me find the problem.
Vapor barrier for ceiling?
Hi, I live in northern Minnesota and I want to build a house with 2by6 walls and 2-2” Layers of exterior rigid foam. I was wondering if there was somewhere I could find the cost savings for my area. Also could someone point me in the right direction as far as the vapor barrier goes? I’m thinking the Sheetrock with paint would be all needed for walls, but what about the ceiling barrier? I am new to posting here, any help would be appreciated.
Thanks,
Lee
Response to Lee Harper
To calculate your annual energy savings, you'll need energy software like REMrate. If you don't have access to the software, you might want to hire an energy consultant or an energy rater.
You can also calculate the difference in heat flow through each square foot of wall, and use that information (along with the number of square feet of wall for your home and heating degree days) to calculate the annual energy savings. But if all of this is new to you, you probably need some help from a consultant.
You don't need a ceiling vapor barrier. What you need on your ceiling is an air barrier -- usually the drywall.
What would happen for our region, Montréal Canada?
Because it would complicate the interpretation of the results, let’s not consider water vapour migration. Considering only the energy transfer aspect, it would be tremendously instructive for the industry up here to be faced with the results of your same exact models (which are all frequent wall assemblies seen around) for our zone 6 Montréal and Ottawa regions.
I bet that would spark many debates around here!
Response to Hugo Viens
Hugo,
Allison Bailes has provided the whole-wall R-values of a variety of wall assemblies. You can choose whatever wall assembly you want, depending on your R-value goals and your budget.
If you are designing a house, you should be familiar with energy software that allows you to calculate how different wall R-values affect your energy bills. If not, you should talk to an energy consultant or an energy rater. This is "Design 101."
Controlling humidity in our mixed humid climate
Allison...
Great article as always, and thank you for addressing cooling rather than heating issues. Here in central Texas could it be a more efficient use of resources to address humidity directly, rather than reducing heat transfer?
1— Many areas of the south have issues with termites and ants, both love to nest between sheathing and exterior foam.
2— Managing humidity increases the comfortable temperature range, especially in cooling environments where the mean radiant temperature is more forgiving ‘while walking about naked.’
3— Repurposing condensate is a resource that may be useful to maintain soil moisture for plants and foundations.
4— It may be more efficient when considering costs and energy use over time to install a dehumidifier in mixed and hot humid zones than increasing insulation.
5— Reducing heat transfer through the roof by adding passive cooling techniques like insulating at the rafters to create a conditioned attic and adding a second roof deck on 2x sleepers (which also reduces leaking and rot like a rain screen wall assembly) to act as a radiator may passively reduce heat transfer.
Though sometimes I over think these things; how do we combine the best overall strategies to our conservation methods?
Your comments, especially the pointing to the flaws of my thoughts, are most appreciated—
Can we infer anything from these numbers?
Specifically, if a 2x4 wall with R-5 is 32% more BTU-efficient than a stock 2x4 wall in all 3 climates, is it likely that a 2x6 wall with R-5 would be 57% more efficient? Or, more importantly - is a 2x6 wall with R5 likely to be 32% more efficient than a naked 2x6 wall?
Response to Rob Hunter
Rob,
We can't compare the "efficiency" of different wall options, because the word "efficiency" applies to machines or processes that involve work. Efficiency is the ratio of the useful work performed by a machine or in a process to the total energy expended or heat expended.
We can, however, compare the R-value of different wall assemblies.
Every time we double the R-value, we cut the rate of heat flow in half. Needless to say, it's easier to justify the cost of upgrading from an R-13 wall to an R-26 wall than it is to justify the cost of upgrading from an R-26 wall to an R-52 wall -- because the annual energy savings from the second example are less than the annual energy savings from the first example.
I've reviewed this article and thread (along with others) several times over the past couple years as I've been designing (and redesigning) the wall assembly for a large addition we're planning. I'm curious what values were used in the first table for a framing factor? I've found in my own calculations that when converting each part of the wall assembly to U values (cavity fill, framing, fenestrations) and adding them up, the results were startling. At one point, I was all excited about building a Bonfig wall because with my 25% framing factor (lots of corners and headers), it gave an R5 boost to overall wall performance using 2x4 construction + Bonfig vs 2x6 construction (using R23 Rockwool cavity fill in each). Not a bad whole wall improvement for simply adding 1" thick strips of polyiso to the studs, plus the 2x4's are much cheaper! But sadly I hadn't put enough info into my spreadsheet yet. When I factored in 25% of the sf for windows and doors at U=.3, I saw the R value delta between standard 2x6 construction and the Bonfig wall drop from R5 to R1.2--leading me to abandon the Bonfig wall for traditional 2x6. (FYI, I initially planned on adding full sheets 2" exterior rigid insulation to a 2x4 wall, but that became problematic due to a complex set of issues relating to furring strips, siding installation requirements, and code).
My takeaway is that energy losers like framing and windows are grossly underestimated in designing the whole wall and trying to budget the biggest bang for the buck. The heat loss through these weak links is beyond what one might think intuitively just based on the square footages. To dramatize the point, I plugged R100 cavity fill into my spreadsheet while leaving the the framing and fenestrations the same, and my whole wall R value only increased by R1!
Log in or create an account to post a comment.
Sign up Log in