

Image Credit: Energy Vanguard
Image Credit: Energy Vanguard This sample of a Build SMART wall panel shows the interior framing (left) and the exterior expanded polystyrene insulation and Zip sheathing (right).
Image Credit: Energy Vanguard Pallets of Build SMART wall panels await assembly.
Image Credit: Energy Vanguard Assembling the wall panels, beginning with a corner piece.
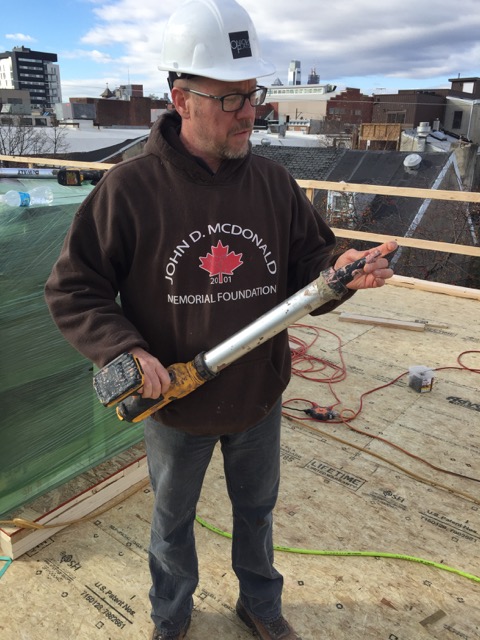
Image Credit: Energy Vanguard Tim McDonald shows the sausage gun used to air-seal the panels.
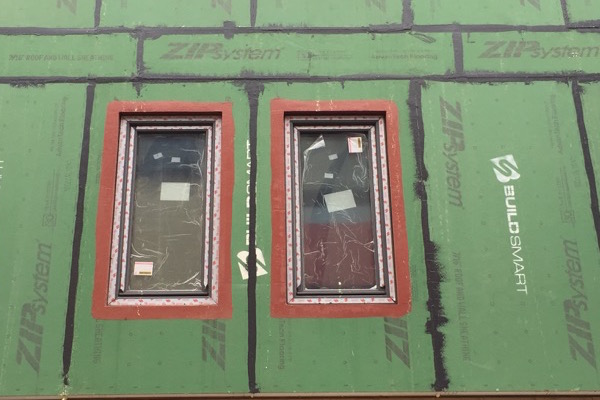
Image Credit: Energy Vanguard Pre-installed windows make the Build SMART system a lot easier and faster to build.
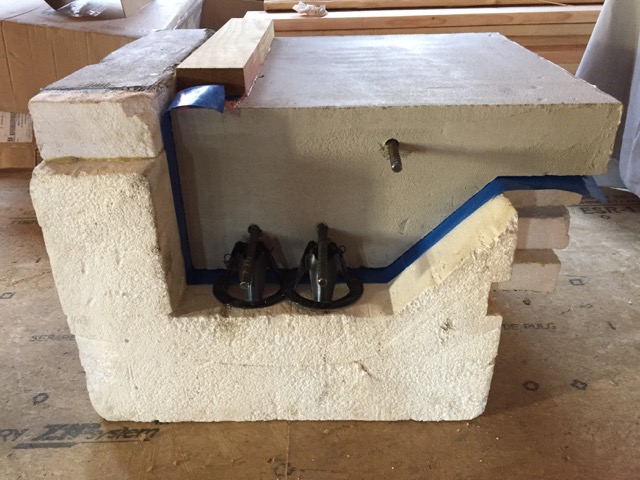
Image Credit: Energy Vanguard The Build SMART J-form makes it easy to make dry, insulated foundations.
Image Credit: Energy Vanguard
More Building Science


If you want to build a superinsulated, airtight house, you run into some difficulties. How do you deal with the extra thickness of your walls and ceilings when you add all that extra insulation? What’s the best way to ensure you hit your airtightness goal? And how do you do all that while keeping the process manageable and the cost affordable?
The new Build SMART panelized system has some answers.
I saw it in Philadelphia, twice
At the 2016 North American Passive House Conference in Philadelphia this past September, Adam Cohen presented on his new panelized building system. His goal, he said, was to develop a way to make it easier to achieve Passive House level building enclosures. He also wanted to make it affordable. Over the past few years, he tried out his ideas and found a system that worked. Cohen then partnered with Prosoco to take it to market it and make it scalable. Thus was born Build SMART.
Last month I took another little trip to Philadelphia to see the Build SMART system being installed. Rob Leonard, who’s been working with Cohen for 15 years and is the field technical manager for Build SMART, met me ahead of time and gave me some background on the company and briefed me on the project I would be visiting.
The next day, Rob and I met up with Tim McDonald, a builder, architect, and Certified Passive House Consultant. The two were giving a tour of McDonald’s project and the Build SMART system. McDonald is building a really neat four-story apartment building in the heart of Philly. The project is going to be Passive House certified and was well underway. They had the first three floors already done and were about to start the fourth floor.
Here’s a little of what I learned on the tour and from my other reading and discussions.
Build SMART wall construction
When you want to build a superinsulated house, you have several choices on how you increase the walls’ R-value. These choices all result in thicker walls. Some methods use all one type of insulation in one place, as in double-stud walls. Most methods have insulation in two places, sometimes with different types of insulation in different places. An example would be framed walls with insulation in the cavities along with more insulation (e.g., foam board or mineral wool) on the exterior.
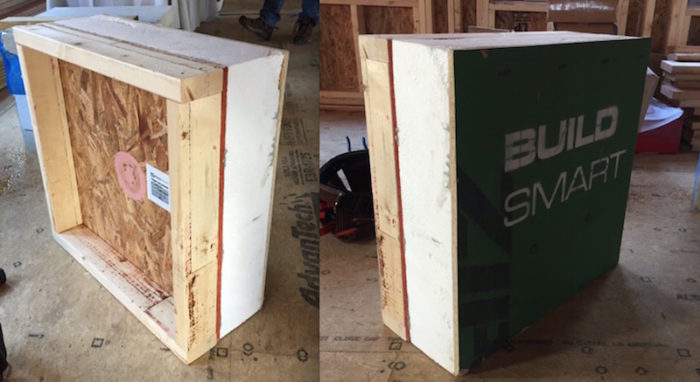
The Build SMART system is the latter type. Image #2, below, shows a small sample of what a panel looks like. It includes a framed wall on the interior (left), OSB sheathing in the middle, then a layer of expanded polystyrene (EPS), and Huber’s Zip sheathing on the exterior (right).
The panels come in four types:
- Straight panels (like the sample shown in Image #2)
- Corner panels
- Window panels
- Door panels
The options are currently limited to a few configurations for each type to keep the process simple and affordable. Some architects may feel too constrained by that, but McDonald sees it as an opportunity to be more creative with the design. For this project, he’s working on some cool ideas with LED lights that make a statement about the energy use of the building.
Assembling the panels
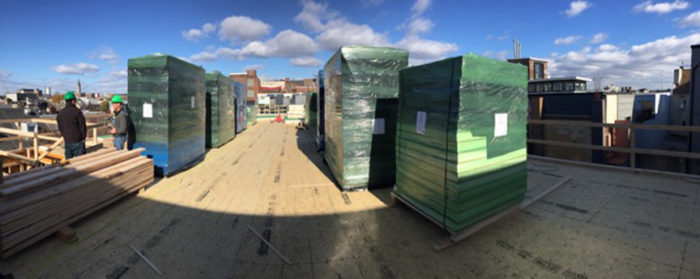
When you’re ready to start assembling the walls, you put everything together in a way similar to doing a structural insulated panel (SIP) building. The first step is staging. You get all your panels moved to where they need to be. In Image #3, below, you can see all the pallets of panels waiting to be installed.
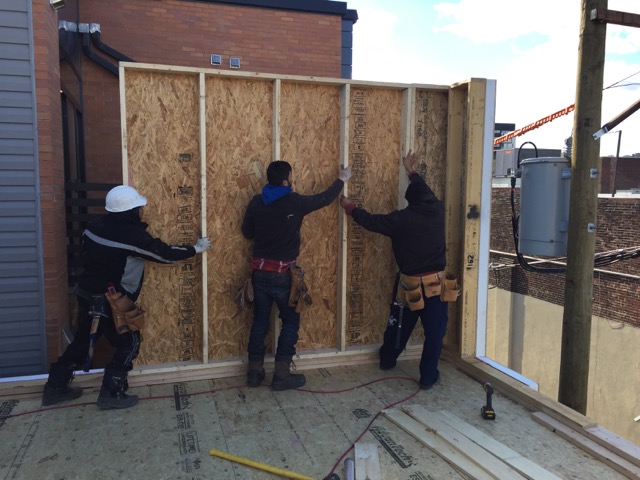
Once you’ve got the panels staged, you start at one corner and keep adding panels. Each panel gets attached to the one you did just before (see Image #4). When you’ve made it all the way around and are back at your starting point, you’re ready to build the next floor above or put the roof over it.
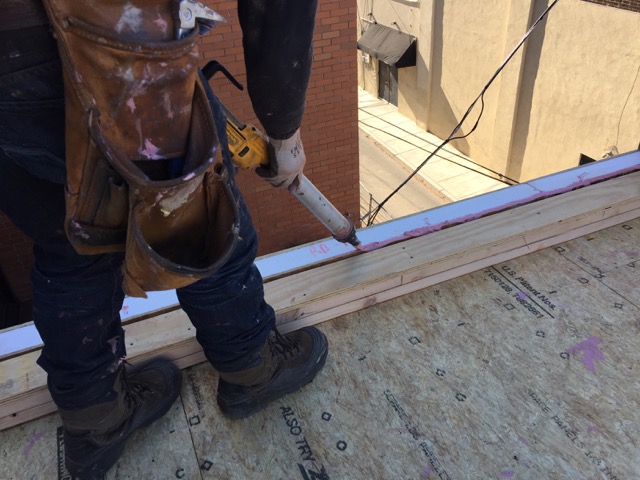
A critical part of the assembly is making sure you get the air barrier all sealed up. In this case, the primary air barrier is the OSB in the middle of the panel. The photo at the top of the article shows a worker installing sealant (Prosoco’s R-Guard Joint & Seam Filler) with a sausage gun.
The water-resistive barrier (WRB) is Zip sheathing and that gets sealed up, too. Huber makes both a tape and a fluid-applied sealant for the seams, and Build SMART recommends that builders opt for the fluid-applied sealant. You can see in the photos that McDonald followed their advice.
Benefits of the Build SMART system
In his presentation during the tour I attended, McDonald said, “The best thing about this system is that the panels come with windows installed.” (See Image #6.) This is a big deal. Most water and air leakage problems in walls occur at windows. It’s not easy to get the flashing details and air sealing done properly with a site-built house. (If you doubt that, just ask anyone who repairs existing homes.)
Yes, if you’re a custom builder and have a stable crew, you can get good window installations consistently. When the windows and doors come factory-installed, however, your job on the site becomes a whole lot easier. And faster.
Another thing McDonald emphasized was how quickly he could finish a project. The Capital 2 project he’s working on is going up at the rate of one story per week. That’s about 5,000 square feet of floor area dried in, insulated, and air-sealed in one week.
They do foundations, too
Another thing the Build SMART team has developed is a form for slab footings. Image #7, below, shows a section of it. It’s a hunk of EPS lined with a vapor barrier. You put rebar inside, fill it with concrete, and voilà — you have an insulated, watertight foundation footing or slab edge.
Is Build SMART the answer?
Well, nothing is the answer that solves all our construction problems. There’s no silver bullet. But the Build SMART panelized system sure does help you get a nice, superinsulated, airtight building that can meet the rigorous standards for Passive House certification.
It’s a new system, and as such, they’re still improving it. When I posted a photo from my visit to Philly on LinkedIn, Professor John Straube made a good observation about air barriers. He said the system looked nice but his “only caveat [is] to add is that you also want the air barrier to be inspectable during construction in a perfect world.”
With this system, the air seal between panels is hidden behind the framing on the interior. If there’s enough of a gap and the exterior hasn’t been sealed yet, light coming through will show places that got missed. There’s not always enough of a gap, though. If a missed seal is behind framing that doesn’t have a gap, you won’t be able to see light coming through. This is far from a fatal flaw, and I expect the Build SMART team to come up with ways to overcome it. For now, make sure the crew putting the panels together understands the importance of sealing every joint and seam and that there’s a good quality control process happening concurrently.
I look forward to seeing the Build SMART system’s evolution. I was really impressed with what I saw of it at the Passive House conference this year. I was even more impressed with what I saw in the field. In fact, I’m even dreaming of building my next house with Build SMART panels.
It may not be the answer, but it certainly helps move high performance building forward. McDonald’s perspective is that Build SMART is “one answer to ‘scaling’ affordable multi-family Passive house and Net-Zero-Energy buildings in this country.”
Allison Bailes of Decatur, Georgia, is a speaker, writer, building science consultant, and the author of the Energy Vanguard Blog. You can follow him on Twitter at @EnergyVanguard.
Weekly Newsletter
Get building science and energy efficiency advice, plus special offers, in your inbox.


7 Comments
Sketchup and Revit
One great thing that Build Smart does is provide Sketchup and Revit modules for designers to play with. This is a great way for anyone to see what they can come up with using these basic components. https://www.buildsmartna.com/products/
Windows
I agree that having windows pre installed is a big deal. Otherwise, I wonder why they chose to add additional framing to a SIPS panel.
Framing
Charlie, The framing appears to provide all of the structural support of the upper floors. I think that makes floor construction and installation of electrical much closer to standard construction practice than with SIPS. My guess is that they think of it more as a framed wall with exterior insulation and the outer ZIP panel is the extra thing.
Response to Charlie Sullivan & Reid Baldwin
Reid is correct. The framed part of the wall is structural. What looks like a structural insulated panel on the exterior is really just nailbase providing exterior insulation. The interior framing can be filled with insulation and also provides a familiar form for electricians and the other trades.
Reid and Allison
If the framing is essentially a conventional load-bearing wall, how have they managed to use a 24" spacing and a single top plate? Once the panels are erected do you add another plate?
i see from the photos they appear to add plates to the bottom of the wall before standing the panels. Any insights as to what's going on?
Framing details
Malcolm,
That's a great question. I didn't ask them about that while I was there, but I just noticed in one of my photos this morning that the panels come with a single top plate. The builder adds the second top plate in the field to tie in the T-walls.
I'm not sure why they added the extra bottom plates. I believe that was specific to this job and not a requirement for the Build SMART system.
Sill plate
The bottom treated sill plate was used to protect the foam j-frame when the raft slab was poured. The 10 mil vapor barrier is turned under it and caulked to form a seal as shown in the installation manual on page 15 and in picture #7 of the photos at the beginning of the article. The installation manual is very helpful to aid the understanding of the system build.
. https://drive.google.com/file/d/0B0vr5FwGqnRsTmZyWlZrbnlQVms/view
Log in or create an account to post a comment.
Sign up Log in